Tutorial 5.1: Limit Cells to Integers 1-100
Author: Greg Hawes- greghawes@byu.net
How You Can Limit Cells to Integers between 1 and 100
1) Click on the cells you want to be limited this way.
2) Click on Data-Validation

3) In the settings tab of the data validation text box, you can restrict the cell to only contain certain characteristics, including a whole number, decimal, list, date, time, text length, or you can customize the cells to contain specifically what you want if it is not already included in the drop down list. For purposes of this tutorial, choose “whole numbers” from the “allow” drop down box.

4) Leave the “data” drop down box as the default restriction “between.” This drop down box allows you to restrict the cell to only contain data in the range you desire. In the “minimum” box, enter 1. In the “maximum” box, enter 100.

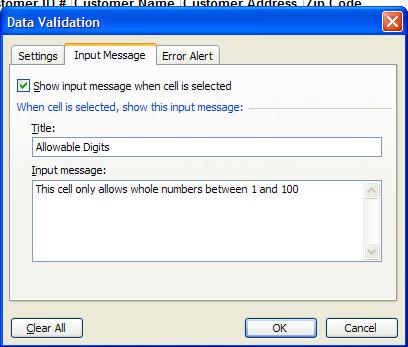
5) Go to the “Input Message” tab in the “Data Validation” text box. This tab allows you to coach the person entering the data. It will display when the cell has been selected. Enter a title and text in the boxes to tell the person what is allowable in the cell. For this tutorial, enter “Allowable Digits” in the “Title” box and enter “This cell only allows whole numbers between 1 and 100” in the “Input Message” box.

6) Click on the “Error” tab in the “Data Validation” text box. This tab allows you to enter hints and messages if the user inputs a disallowed entry in the given cells. Under the “style” box, you have the choice between “stop,” “warning,” and “information.” By choosing “stop,” the user cannot enter the value he/she entered in the cell. It will not ever allow the cell to include a whole number that is less than 1 or greater than 100 in this case. By choosing “warning,” a box will pop up with the error message you include. The default setting in the box is to disallow the entry. By choosing “information,” excel will prompt the user with the error message, but the default setting in the box will be to allow the entry outside the range. For purposes of this tutorial, choose “Stop” from the drop down list.
Similar to the “input message” tab, the “error alert” tab allows you to title and enter a message to the user. This message will pop up if the user enters a number outside the given range. For purposes of this tutorial, enter “Allowable Digits” in the “Title” box and “This cell only allows whole numbers between 1 and 100” in the “Error Message” box.

7) Click “OK.”
8) Notice that when you click on any of the cells that were highlighted when you entered this restriction, the prompt you entered in the “Input Message” tab comes up to help the user know what is allowable within the cell.
9) Enter a number outside the range in the cell selected. Enter 150. Because you chose “Stop” under the “Style” drop down box in the “Error Alert” tab, the error message you typed in displays and the only options are to “Retry” the entry or “Cancel.” The user will not be allowed to enter 150 into the cell.

If, on the other hand, “Warning” instead of “Stop had been selected, the error message would display, but excel would allow the user to input 150 by selecting “Yes.” Notice, however, that the default selection for a warning is “No.” Had “Information” been selected, the default selection in the message box would have been “Yes.”

This data validation tool is very useful at preventing simple data entry errors in excel. The input messages can also be used to aid the user in entering data in the correct format. For instances, you can have the message say “enter height in inches”, so the user knows not to use feet or yards. You can also have the input message say “enter date as mm-dd-yyyy” to ensure the user enters the date in the desired format.
Leave a comment