Tutorial 4.1: Creating Passwords and Password Protecting Your Documents
Information taken from Microsoft Office
Source:
Overview
 |
Length: 30-40 minutes
Rating: |
|||
| Applies to: Microsoft Office Excel 2003 | ||||

Make your workbooks more secure by using passwords.
| COURSE TEXT
Do you have a workbook that you don’t want anyone else to open, or that you’d like to restrict viewing to just you and a few others? Require a password to open that workbook and view its data, and you help make your file safer and more secure. A password is not of much use if just anyone can guess it – you need a strong password if you require one at all. What’s a strong password, and how do you choose one? It’s no secret – it’s all right here. |
Password-protect a workbook

Figure 1 You can create a password when you save a workbook. On the File menu, click Save As. In the Save As dialog box, click Tools, and then click General Options.
Figure 2 Or you can create a password another way: On the Tools menu, click Options, and then click the Security tab.
| COURSE TEXT
Imagine that you have a workbook that you don’t want anyone else to open except for you, and perhaps a select few. To create a password, you can start from either of two places:
-or-
We tell you about both places because where you enter passwords looks a little different at either location, but the passwords you create at either place are the same. |
Create passwords

Figure 1 When you save a file, you can create passwords in the Save Options dialog box.
Figure 2 You can create the same passwords on the Security tab in the Options dialog box.
| COURSE TEXT
You have the option to create not one, but two passwords:
Note A Password to modify helps prevent people without the password from saving their changes in your original document, but it does not stop them from making changes and then using the Save As command to save the document as a new file with a different name. If someone has the Password to open but not the Password to modify (if you’ve created that password), no changes can be made to the file. If you give a person both passwords, changes can be made to the file. Tip If you don’t want just anyone to access your data when you leave your computer, you can lock your computer by pressing CTRL+ALT+DELETE, and then clicking Lock Computer, if your computer is on a domain. When you return, press CTRL+ALT+DELETE again and then enter your computer password to unlock your computer. |
Select an encryption type

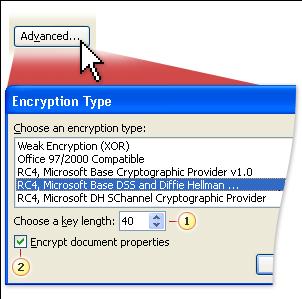
![]() The Choose a key length box is made available when an RC4 encryption type is selected. This is the length of the key used to encrypt the file.
The Choose a key length box is made available when an RC4 encryption type is selected. This is the length of the key used to encrypt the file.
![]() The Encrypt document properties check box is made available when an RC4 encryption type is selected. It prevents unauthorized people from viewing file properties such as the author name.
The Encrypt document properties check box is made available when an RC4 encryption type is selected. It prevents unauthorized people from viewing file properties such as the author name.
| COURSE TEXT
Encryption is a method of converting information into a coded form (ciphertext). If an unauthorized person tries to view the file, the data in the file is seen as garbled characters and symbols. When you enter a Password to open, both the password and the contents of the workbook are encrypted. Note that a Password to modify is not an encrypted password. If you only password-protect a file with a Password to modify, your file will not be encrypted. There are different encryption types that you can choose that offer different levels of security. To make a selection in the Encryption Type dialog box, click the Advanced button either in the Save Options dialog box or on the Security tab. Office 97/2000 Compatible is selected by default so that people who use Microsoft Office 97 or Office 2000 can open a workbook. If you don’t need to have people with Office 97 or Office 2000 open the workbook that you want to encrypt, the recommended encryption level is one of the RC4 encryption types. If you select any one of the RC4 encryption types, the Choose a key length box is made available. This refers to the length of the encryption key used to encrypt the file. Key lengths begin at 40 and go up to between 56 and 128. As a rule, the larger the key length, the more difficult it should be for anyone to discover the encryption key. It is recommended that you use the largest key length possible (128 in most cases). When one of the RC4 encryption types is selected, the Encrypt document properties check box is made available and selected. This option prevents unauthorized people from viewing file properties such as the author name or any custom file information, which they could otherwise do by right-clicking the file and then clicking Properties on the shortcut menu. The Quick Reference Card contains a link to more information about encryption. Note The encryption types available in the Encryption Type dialog box depend upon the operating system running on your computer. |
Create strong passwords

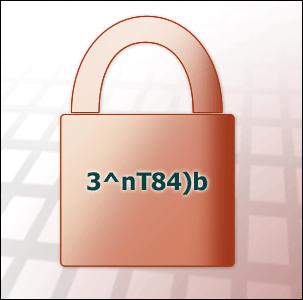
A strong password is like a padlock: It will lock out most people, but it can still be broken. (Lots of people are taking this course, so you shouldn’t use the password shown here.)
| COURSE TEXT
No password is 100 percent secure. It can always be guessed or worked out. However, you can swing the odds in your favor by using a strong password. A strong password cannot be easily worked out by anyone else. You should use strong passwords wherever you need a password. For example, for your computer or Web account logon, or for protecting your workbooks. Strong passwords:
Change passwords frequently – at least every one to three months. When you replace a password, make sure it’s totally different from the previous one and do not reuse any portion of the old password. Use caution when a Microsoft Windows® dialog box asks if you want Windows to remember a password. If you say yes, you are, in effect, giving anyone who logs on to that computer access to your password. |
But I’ve forgotten my password…

If you forget the password, you’ll be locked out.
| COURSE TEXT
If you forget a password for a workbook, there’s nothing you can do. You’re locked out until you can remember it. Some people say to never, ever write down any password; others say to keep the list in a secure place that only you know (either as a hard copy or in another file on your computer – for example, in an e-mail message). No one suggests writing passwords on a note and sticking them to your computer monitor. It’s a matter of common sense, and it’s up to you. |
Read-only recommended option

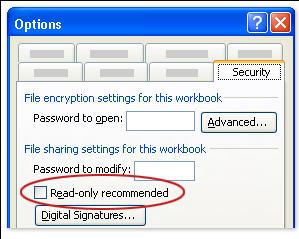
Files may not be as secure as you think if you use only this option.
| COURSE TEXT
Some of the settings that appear on the Security tab, including some that sound like security features, do not actually help secure workbooks. For example, Read-only recommended does not secure a workbook. It is only a guideline for readers – someone could still edit the data. But if you would like to remind others that data is important and should not be changed, you can have Excel recommend that a workbook be opened as read-only. When you select the Read-only recommended check box, users will get a read-only recommendation when they open the file. But keep in mind that users can ignore the recommendation and open the file to make changes in it. |
Practice

| COURSE TEXT
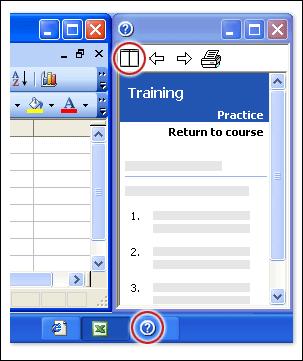
Now you can try out password protection for yourself. You’ll create a strong password, and then add a password to an Excel workbook. You’ll also take a look at the different types of encryption, and you’ll see what happens when you use the Read-only recommended option. About the practice session When you click Practice in Excel, a practice worksheet will download to your computer and open in Excel, and a separate window with practice instructions will appear alongside (see picture). Note You need to have Excel 2003 installed on your computer. Tips
Before you begin Make sure to close Excel if it is already running. Start the practice Click the Practice in Excel button now |

Leave a comment